A new uPVC door will improve both the appearance of your Lancashire home and its security. Moreover, these doors are constructed to deal with the UK’s weather conditions as they do not warp with rain or wind. They can help insulate the house and cut down on heating expenses. This DIY uPVC door fitting guide helps Lancashire homeowners from collecting safety gear and tools required to leveling and sealing the door frame. Moreover, you will gain valuable tips regarding home door installation while knowing pitfalls to avoid to ensure your project is safe and smooth.
Tools Needed
Before starting, gather equipment necessary to start working on a project such as:
- Measuring tape and spirit level: These measuring tools ensure accurate dimensions are taken while also ensuring that both the door and frame are set plumb.
- Cordless drill and screwdriver set: A power drill requires various bits including masonry bits as well as screwdrivers or driver bits that match to them.
- Wall plugs and screws: For setting up the frame, use long screws such as 100-150 mm alongside compatible wall plugs.
- Chisel combined with a hammer along with pry bar: Tools for removing the old trim or door alongside helping adjust the new frame in place.
- Shims/packers made from plastic materials: Small wedges such as αυτά assist in keeping starting points level after securing the new frame.
- Silicone sealant and caulk gun: Weatherproofing requires exterior-grade silicone or PU sealant.
- Expanding foam (optional): For large gaps around the frame post leveling.
- Safety Equipment: At minimum, protective gloves and safety glasses.
Common errors, such as the need for a spirit level, packers to ensure a straight frame, have been addressed in the installation guides. Gathering tools reduces time spent on the project and helps streamline processes. For those not confident in DIY fitting, consider a professional uPVC doors supply and fit service to ensure proper installation and peace of mind.
Important Safety Measures
Constantly emphasize safety perspective throughout all steps of this project. Key precautions include:
- Wear protective gear: Eye and hand safety gear must always be worn to protect from sharp edges and debris.
- Manage workspace: Remove clutter like covering nearby furniture that may be knocked over as well as providing good light ensures optimal vision and airflow.
- Handle heavy objects with caution: Doors and frames made from uPVC materials are relatively heavy so ensure additional support when lifting to prevent back injuries from straining caused by awkward angles needed for positioning.
- Do not misuse tools: Before use check them while ensuring you face away from yourself.
Manufacturer specifications must be adhered to (warnings/caution signs/special guidance) wherever applicable while ignoring these would lead to improper handling and fit which designated aim of these instructions is containment through avoidance of disregard rules set by the door/frame supplier.
The above precautions not only help prevent accidents but also ensure a smooth and structured installation process. By controlling variables and maintaining consistency at each stage, you enhance both safety and efficiency. A well-organized, step-by-step approach supports continuous progress, reduces errors, and leads to a high-quality result that aligns with your initial project goals. Staying focused and methodical allows you to unlock your full potential throughout the DIY process—delivering a seamless, satisfying outcome.
Step-by-Step Installation Process

Step 1: Remove Existing Door and Frame
- Break the seals: Use a utility knife to cut through any old sealant around the frame of the existing door. This helps break the bond which holds the frame with walls.
- Remove hardware: Using a screwdriver, unscrew and remove all hinges, handles and locks from the door. Preserving the screws will be useful if you plan on reusing them later.
- Detach the frame: Use either drills or screwdrivers to loosen all screws holding the frame to the wall (usually found near corners or along jambs). Loosen all firmly fixed screws to enable easy removal of frames.
- Pry out the frame: Utilize pry bars or sturdy screwdrivers between frames and walls. Gently lever away starting from edges then work your way towards centers taking care not to apply too much pressure to one edge as this may crack the walls.
- Remove door leaf: With assistance lower detach door leaf while holding at hinge joints often helps by placing on supports like sawhorses temporarily until fully removed safely as units may become cumbersome especially when dismantled.
- Clean the opening: After removing the old frame, clean the rough opening. Remove any debris and old sealant or foam, and check that the wall is sound. Having a clean and level opening is required for proper fitting of the new door.
Tip: To avoid additional work, protect landscaping or cover flooring before removing the door. This will minimize damage from broken trim and sealant.
Step 2: Measure and Prepare The Opening
Measure width and height in top, middle, and bottom positions to account for irregularities. New uPVC frames must fit less than openings by roughly 10mm to accommodate adjustments and expansion allowance. Make sure that the rough opening is plumb (vertically straight) and level.
Shim sanded uneven walls or sills as needed. Installing an unlevel opening leads to crooked or sticking doors which complicates functionality—this step is critical. Clear any protruding mortar or debris which prevents flush seating of the frame.
Pitfalls to avoid: gaps forming due to loosely fitted doors caused by inaccurate tight measurements during installation. Always double-check dimensions before proceeding to ensure accuracy while measuring so steps aren’t taken redundant due. For a detailed overview of best materials and door types, refer to our full uPVC doors guide.
Step 3: Set up the Position and Level the New Frame
- Fit the threshold (cill): If applicable, external sill should be trimmed to marked lines where end caps should be adhered. Apply silicone sealant beads along the back seam where the cill and wall intersects. Place the cill as described and use packers (plastic wedges) to raise it to level.
- Offer up the frame: With assistance, fix the new uPVC frame into position by lifting it through the opening and resting it on leveled cill. Check using a spirit level on top and sides if it is plumb and square. There should be some space (around 3 – 5 mm) all around for gap adjustment but it must be equal throughout all sides of frame to ban twisting during expansion.
- Insert packers: At every fixing point which are corners and midpoints of jambs, insert plastic packers at these locations between The frame is in wall to hold it rigid WITHOUT STRAINING THE FRAME SHAPE. These spacers create consistency so that when fastening they do not bend out of shape.
- Establishing the secure frame: Bore pilot holes in the fixing slot openings of the frame to wall studs or brick. Fix the frame to the wall using uPVC fixings. Start from hinge side bottom, then hinge top, then lock side so you can fine-tune while you finish securing all screws. Use minimum 4-5 fixings per side (more for wide doors) with a spacing of 150 mm from corners and 600 mm along each side.
- Confirm Alignment: While loosely tightening screws, check again if the frame is level and plumb. Add or change packers as required before final screw tightens to avoid unbalanced stretching on tighten joints. Overtightening any screws will warp the entire frame structure.
Most Common Mistake: Forgetting to use packers – which are essential – combined with over-tightening reduces stability and can rotate twist major support joints parts around its neutral axis rotation point where frames balance center weight lies inside tightly held structure center point gaussian core shell enclosure buffer void space form.
Always maintain uniform supple rigid shims between frame pivot section outer perimeter tangential interface surface zone slack circumferential cylindrical regions gap zones spanning radial fields ring collar gaps joint at each fastening tension strap bonding anchors supports bind tether screw anchored point fasten screws slowly.
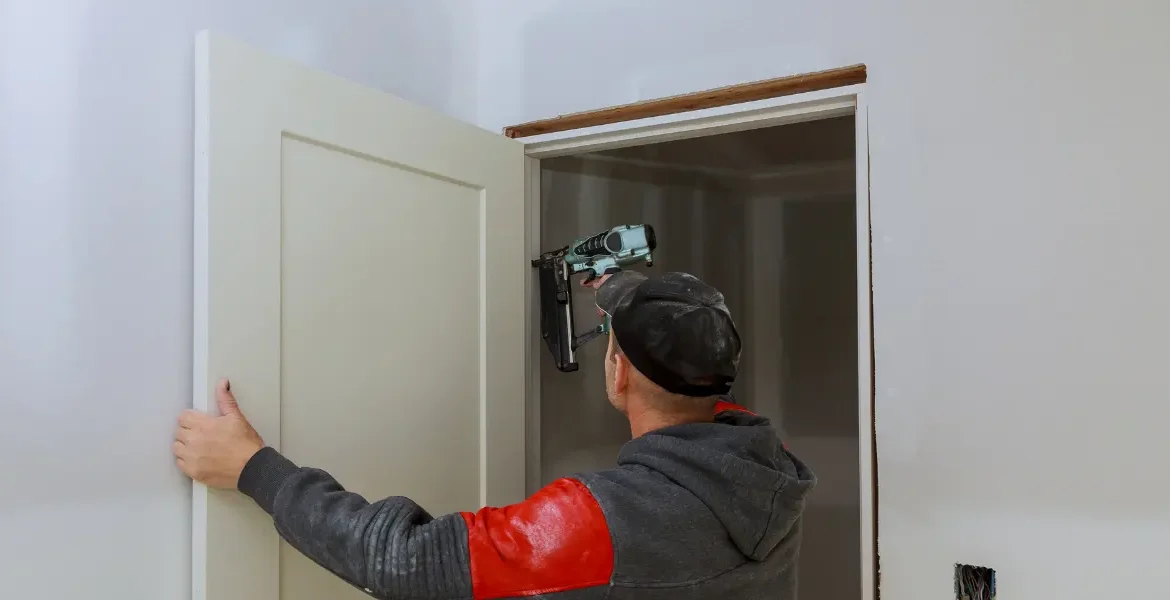
Step 4: Attach Door Leaf and Install Hardware
As soon as the frame is secure, you can hang the door. With assistance, raise the door leaf so that its hinge leaves match with the frame hinges. Insert the pins or screws that fasten hinges to the door frame to further attach the door.
Verify that the door is able to swing freely and does not bind—the gap between the door and its frame should be uniform (3-5 mm) top and bottom plus side-to-side. Should dragging occur, make fine adjustments by loosening hinge screw(s).
Now fit rotary tools for modification of: latch, lock cylinder, handle and also escutcheons as per manufacturer guidelines. Functionality of all parts need verification; deadbolts have full range motion into the strike plate(capturing area) and turning handles should not encounter resistance are examples of checks to perform.
Pro tip: While fastening screws shut on the hinge jamb, it really helps to plumb it using a level tool on the hinge jamb itself. After closing and opening multiple times check it one more time while verifying for any irregularities.
Step 5: Seal, Insulate, and Finish
Installation is complete with the hardware placed and the door hung:
- Insulate gaps: Use low-expansion polyurethane foam or expanding foam insulation to fill any gap that persists around the frame. This enhances energy efficiency as well as preventing drafts. Avoid overfilling since it expands significantly – provide just enough for trim removal during the curing phase.
- Refit trim and covers: Restore any decor such as trim, and architraves while also covering strips that hide gaps or fasteners. Trim them to appropriate length and secure using adhesive or nails based on requirement.
- Caulk all edges: Perpetuate a bead of silicone sealant on both inner perimeter frame sides with outer one using exterior grade sealing options. Bottom corners (under cill) require closer attention for water ingress shielding. Smoothing sealant with fingers creates neat edges finishing touch.
- Clean up: Once the door and hardware are installed, remove any stickers, protective film, or packaging from the glass and door surfaces. Wipe away fingerprints, silicone residue, or any construction debris using a soft cloth and appropriate cleaning solution. Remove any visible packers or shims that are no longer needed. Trim and tidy up any sealant edges to ensure clean lines around the frame. Finally, sweep or vacuum the work area to remove dust and debris, leaving a neat and polished finish.
Ensure yet again to test the door in all operational functions. Confirm that it bounds no issues with locking or latching and there are no mechanical snags while engaging with opening or closing motion. Make final adjustments hinge and strike plates as necessary to provide a better fit.
Common Mistakes to Avoid

Even taking caution, every DIY install will have moments of weakness. Look out for these common blunders:
Measuring incorrectly:
Noting measurement details accurately is very crucial as any frame cut should not be over too tight or too loose. Always ensure to revisit your measurements and remember to give space around the indicated size for changes.
Ignoring shims:
Omitting such small parts can cause big impacts for example your frame might bend If you tighten screws which result in a locked door.
Fixings need gentleness:
When applying pressure, overtightening results in strain on the uPVC frame leading to it losing shape. If stuck into position not twisted gently it may result because square hence impossible closure.
Uneven floor levels:
Floor must also fall level with Doorway otherwise unevenness results catching edge or grinding against surface as example. Make sure to check command using level reading tools before fitting angles and if needed allows correcting mechanism used during setting up step.
Hinge malfunction:
Opening doors with misaligned hinges causes friction and wear is caused by poorly fastened screws, either too deep or shallow. Make sure that the hinge leaves are vertically aligned and flush with the jamb to avoid crooked doors.
Drafts and leaks:
Drafts and leaks can also be caused by insufficient sealing which neglects all gaps along the perimeter frame. As mentioned above, applying quality soft sealer gunned into the joints will reduce all exterior gaps therefore providing a good seal.
Following these guidelines will greatly reduce issues in the future.
Getting Professional Help

Installing a uPVC door brings satisfaction when done well but it is also precision work. For anyone who wants a perfect finish, Bowland Windows and Doors provide professional help. They are experts in underperformed uPVC doors installations across Lancashire ensuring high standards for smooth functionality along with seamless fitment enabling effortless operations without obstruction. Not sure about the cost? You can read our updated new front door cost guide to make informed decisions for your home and budget.
Doesn’t matter if it’s a DIY project or done professionally, correct alignment guarantees enhanced security, better energy savings, as well as style that lasts for years. That is the reason why homeowners looking for tranquility and effective value should contact Bowland Windows.
👉 Looking to change your entrance? Get in touch with Bowland Windows today for tips, cost-efficient pricing, and an easy installation process.
FAQs
With attention to detail, the right tools, and patience, you are able to undertake fitting a uPVC door yourself. Take note that professional installers will ensure correct fitting which guarantees security and full manufacturer warranty protection.
Place the frame in the designated opening, level it, secure it with fixings, insert the door sash, align hinges and seal around the frame then test all locking mechanisms.
An UPVC door is made of reinforced steel/aluminium core with insulated interior as well as multi point locking system. Besides the reinforced cores doors have uPVC outer skins. They are welded with durability in mind enhancing thermal efficiency.
UPVC doors are superior when comparing them to standard PVC for homes due to being stronger and more weather resistant while non-toxic making them more long-lasting than other materials.Vinyl PVC being softer makes them less suitable for structural applications such as front doors.
uPVC doors typically last 20 to thirty years with correct treatment. Regular cleaning, lubing hinges, and inspecting seals assist maintain their resilience, energy effectiveness, and safety and security over time.